Now that you have the general idea on how to run a Rails app on Docker, it's time to get a little deeper and get it working with a database and filesystem.
Before continuing, please make sure you have gone through Part 1 on building a docker image for the awesome-rails app and running it as a container.
First thing first, make sure the docker image you built previously still exists before continuing

Rails app often would need to deal with files, whether user uploaded files, temporary files or simply the log files, and since when a Rails application is running in a container, those files sit within the container; When a container is removed, all the files within it are gone. This is where Docker Volume comes in. A Docker Volume is essentially a way to stores files needed by a container outside of the container. Think of it as the Linux mount command.
Let's start by creating a new docker volume called awesomedata
A volume is just a directory sitting somewhere on the host machine, typically at /var/lib/docker/volumes/ on a Ubuntu machine.
Note: Docker for Mac is essentially running inside a VM, you won't find that directory on your Mac.
You can see all the volumes on your machine

Here you can see that awesomedata is listed with "local" driver. "local" driver basically means the volume sits locally on the disk.
Now that we have a volume, we can mount it to the awesome-rails app created earlier. Make the running container from Part 1 has been removed as indicated at the last portion of that article.
Re-run the awesome-rails docker image and mount the newly created awesomedata volume
--name switch gives the running container a name, if you didn't specify one, docker engine will randomly assign one for you. Setting a name is useful because you can issue commands without relying on the Container ID.
-d switch tells docker engine to run the container as daemon.
-v switch is telling the docker engine to mount awesomedata volume to a directory on the container. In this case, the mount point is the public directory of the rails app.
You can have as many mount point as you need.
Note: If you need to change the mount point of the container, you need to remove the old container first
While docker volumes are useful, sometimes you might just want to mount a host directory (or files) directly to the container. To do this, you just use -v: to mount. E.g.
Note: This is just an example you don't have to run this for this tutorial
In this example, the log directory on the host to is mounted to the log directory in the container. The `pwd` is referring to the current directly where you run the command.
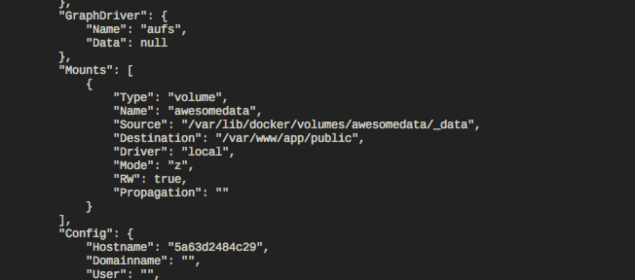
You can verify the mount points using docker inspect command
Docker inspect will output details regarding the running container, the mount point information is park under the "Mounts" section. While you're at it, glance through the whole output to see what's in there.
Now that you know what is a docker volume, and why we use it, let's proceed to create a Postgres database container, with data stored in a docker volume.
Let's starts by creating a docker volume to store the database file. Again, we need to do this because we don't want to lose our data whenever we remove the database container.
I'll name this `pgdata96` because I often run multiple version of Postgres, and each of them would be using different volume.
Start a new Postgres 9.6 container and mount the pgdata96 volume to it.
Docker engine will now pull the official Postgres 9.6 docker image from docker hub to your machine, and run it. The `pgdata96` volume will be mounted to `/var/lib/postgresql/data` directory of the container, which Postgres uses to persist the database files.
`POSTGRES_PASSWORD` environment variable define the superuser password. If you can use the `POSTGRES_USER` environment variable.
Note: You can find information on how to run the Postgres container from the official Postgres docker hub page.
If you have a Postgres client installed, you try connect to the Postgres database. E.g. Using pgAdmin. Username for Postgres superadmin is `postgres`, password is as what you set ealier.

This is very much standard, you just have to configure the `database.yml` file and tell Rails where the database is and provide the credential.
Configure the production environment section of the `database.yml` file
Update `.env` file to include the environment variables
Note that we set the `DATABASE_HOST` to `db` because we're going to link the database container to the Rails container with the name `db`
Inspect the container links to make sure it's linking correctly
Output:
You can also verify the linking is successful by ssh into the awesomeapp, and connect to it via psql command tool.
Setting up your container to store data outside of the container is crucial, I find this out the hard way. You really don't want your database data or uploaded files get removed whenever you remove your container; Docker volume is an obvious choice for this. You can even specify a docker volume that uses Azure Blob Storage, that way your data will always be persisted and secured outside of the host machine.
Linking allows containers to "talk" to each other with a simpler way, each container has it's own IP address in the docker environment, and linking allows you to communicate by using an alias. When the project grew bigger, you might have several container on the same project
When a project gets more complex, you might have several containers, such as:
You might want to consider using `docker-compose` to handle the build and runtime. `docker-compose` is essentially shorthand for running complex `docker` commands.
Before continuing, please make sure you have gone through Part 1 on building a docker image for the awesome-rails app and running it as a container.
Outline for this tutorial.
- Mounting volume to container
- Creating Docker Volume
- Mounting volume to container
- Mounting host directory (or file) to container
- Docker inspect
- Setting up a database container and connecting to it from Rails container
- Setup Postgres container
- Running Rails app and linking it with the Postgres container
- Verifying the link
- Conclusion
First thing first, make sure the docker image you built previously still exists before continuing
docker images
Mounting volume to container
Creating Docker Volume
Rails app often would need to deal with files, whether user uploaded files, temporary files or simply the log files, and since when a Rails application is running in a container, those files sit within the container; When a container is removed, all the files within it are gone. This is where Docker Volume comes in. A Docker Volume is essentially a way to stores files needed by a container outside of the container. Think of it as the Linux mount command.
Let's start by creating a new docker volume called awesomedata
docker volume create awesomedata
A volume is just a directory sitting somewhere on the host machine, typically at /var/lib/docker/volumes/ on a Ubuntu machine.
Note: Docker for Mac is essentially running inside a VM, you won't find that directory on your Mac.
You can see all the volumes on your machine
docker volume ls
Here you can see that awesomedata is listed with "local" driver. "local" driver basically means the volume sits locally on the disk.
Mounting volume to container
Now that we have a volume, we can mount it to the awesome-rails app created earlier. Make the running container from Part 1 has been removed as indicated at the last portion of that article.
docker rm
Re-run the awesome-rails docker image and mount the newly created awesomedata volume
docker run --name awesomeapp --env-file .env -v awesomedata:/var/www/app/public -p 3002:3000 -d awesome-rails:0.1
--name switch gives the running container a name, if you didn't specify one, docker engine will randomly assign one for you. Setting a name is useful because you can issue commands without relying on the Container ID.
-d switch tells docker engine to run the container as daemon.
-v switch is telling the docker engine to mount awesomedata volume to a directory on the container. In this case, the mount point is the public directory of the rails app.
You can have as many mount point as you need.
docker run --name awesomeapp --env-file .env -v awesomedata:/var/www/app/public -v tmpdata:/var/www/app/tmp -p 3002:3000 -d awesome-rails:0.1
Note: If you need to change the mount point of the container, you need to remove the old container first
Mounting host directory (or file) to container
While docker volumes are useful, sometimes you might just want to mount a host directory (or files) directly to the container. To do this, you just use -v
Note: This is just an example you don't have to run this for this tutorial
docker run --name awesomeapp --env-file .env -v `pwd`/log:/var/www/app/log -p 3002:3000 -d awesome-rails:0.1
In this example, the log directory on the host to is mounted to the log directory in the container. The `pwd` is referring to the current directly where you run the command.
Docker Inspect
You can verify the mount points using docker inspect command
docker inspect awesomeapp
Docker inspect will output details regarding the running container, the mount point information is park under the "Mounts" section. While you're at it, glance through the whole output to see what's in there.
Setting up a database container and connecting to it from Rails container
Setup Postgres container
Now that you know what is a docker volume, and why we use it, let's proceed to create a Postgres database container, with data stored in a docker volume.
Let's starts by creating a docker volume to store the database file. Again, we need to do this because we don't want to lose our data whenever we remove the database container.
docker volume create pgdata96
I'll name this `pgdata96` because I often run multiple version of Postgres, and each of them would be using different volume.
Start a new Postgres 9.6 container and mount the pgdata96 volume to it.
docker run --name postgres96 -v pgdata96:/var/lib/postgresql/data -e POSTGRES_PASSWORD=password -d -p "5432:5432" postgres:9.6
Docker engine will now pull the official Postgres 9.6 docker image from docker hub to your machine, and run it. The `pgdata96` volume will be mounted to `/var/lib/postgresql/data` directory of the container, which Postgres uses to persist the database files.
`POSTGRES_PASSWORD` environment variable define the superuser password. If you can use the `POSTGRES_USER` environment variable.
Note: You can find information on how to run the Postgres container from the official Postgres docker hub page.
If you have a Postgres client installed, you try connect to the Postgres database. E.g. Using pgAdmin. Username for Postgres superadmin is `postgres`, password is as what you set ealier.
Configure Rails database connection
This is very much standard, you just have to configure the `database.yml` file and tell Rails where the database is and provide the credential.
Configure the production environment section of the `database.yml` file
production:
 <<: *default
 database: awesome-rails_production
 host: <%= ENV['DATABASE_HOST'] %>
 username: <%= ENV['DATABASE_USERNAME'] %>
 password: <%= ENV['DATABASE_PASSWORD'] %>
Update `.env` file to include the environment variables
SECRET_KEY_BASE=597eae9051c822c955c4e44f98e75b14beb7596845678e9bf8acab5fd02e7f12b1fec0ce5c2c2b526d2some3random4text2c1b
RAILS_LOG_TO_STDOUT=1
DATABASE_HOST=db
DATABASE_USERNAME=postgres
DATABASE_PASSWORD=password
Note that we set the `DATABASE_HOST` to `db` because we're going to link the database container to the Rails container with the name `db`
Running Rails app and linking it with the Postgres container
# Stop and remove the awesomeapp container
docker stop awesomeapp && docker rm awesomeapp

# Run the awesomeapp container and link the Postgres container
docker run --name awesomeapp --link postgres96:db --env-file .env -p 3002:3000 -d awesome-rails:0.1
Verifying the link
Inspect the container links to make sure it's linking correctly
docker inspect -f "{{ .HostConfig.Links }}" awesomeappOutput:
[/postgres96:/awesomeapp/db]
You can also verify the linking is successful by ssh into the awesomeapp, and connect to it via psql command tool.
# Ssh into the awesomeapp container and starts a bash session
docker exec -it awesomeapp bash

# Connect to the database container.
# If you are able login to postgres from the awesomeapp container, it essentially means the link works correctly.
psql -h db -U postgres

# You also try ping the db server
ping db
Conclusion
Setting up your container to store data outside of the container is crucial, I find this out the hard way. You really don't want your database data or uploaded files get removed whenever you remove your container; Docker volume is an obvious choice for this. You can even specify a docker volume that uses Azure Blob Storage, that way your data will always be persisted and secured outside of the host machine.
Linking allows containers to "talk" to each other with a simpler way, each container has it's own IP address in the docker environment, and linking allows you to communicate by using an alias. When the project grew bigger, you might have several container on the same project
When a project gets more complex, you might have several containers, such as:
- Web app container (E.g. Rails)
- Database container (E.g. Postgres)
- Worker container (E.g. Sidekiq)
- Cache container (E.g. Redis)
- Proxy container (E.g. Nginx)
You might want to consider using `docker-compose` to handle the build and runtime. `docker-compose` is essentially shorthand for running complex `docker` commands.
[…] How to run Ruby on Rails on Docker (Part 2) […]
ReplyDelete